Today I thought I’d start look at something aimed at (sort of) beginners. One of the things I wish I’d had when I’d started learning was a clear cut way of understanding chord and scale relationships. It always seems to be something you learn “down the track”, but I firmly believe it is something you should be looking at early ion your learning, so here goes.
I’m going to be using the C Major scale for this, firstly because the Major scale is the main point of reference for all other scales and modes, and secondly because there are no sharps or flats to worry about in the key of C.
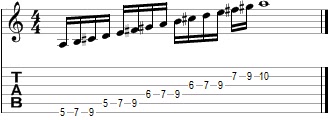
Have a look at this basic C Major scale shape:

Now you can probably already see the shape of an open position C Major chord in that pattern, but to give us all the notes we'll need to form the other open position chords in the key of C Major, we're going to need to expand it to cover all six strings.
Something like this :

So that now we've covered every note in the key of C over six strings in the open position we can start to build the corresponding chords. Given that the formula for a Major chord is 1-3-5, we can see that a C Major chord should contain the notes C (1) E (3) and G (5), and we know this is a Major chord because the interval between the 1 and 3 is 2 whole tones. Now if we move on to the next note, D, and apply the same formula within that scale we should end up with D (the first note) F (the 3rd note from D) and A (the 5th note from D). Now, since the interval from D to F is 1 1/2 tones, this is a minor chord. That difference in the intervals between the first and third notes tells us straight away whether a chord is Major or minor.
Remember - Major = 2 whole tones
minor = 1 1/2 tones
Now that you can see the general point I'm trying to make, go ahead and construct the chords for the rest of the scale. Naturally, you're going to end up with the same chord shapes you already know, but by actually reasoning them out you'll be developing a better understanding of why this fingering makes an A minor or that fingering makes G Major, and when you start moving further up the guitar neck that understanding will help you in many ways, such as finding a chord shape on another area of the neck or choosing an alternate voicing for a chord.